Azure Resource locks are a new type of metadata that can be applied to Azure resources.
Resource locks have been designed with the intention of providing a way for administrators and service owners to manage access to critical resources such as databases, virtual machines (VMs), and cloud services among others. -They provide an extra layer of security by preventing unauthorized users from accessing your data or applications which could lead to data loss, downtime, or even worse. The best practice is always to create resource locks on your critical Azure resources before deploying them in production environments.
Consider a scenario that an IT administrator is cleaning up unused Azure resources as part of a routine maintenance assignment. By mistake, the administrator deleted resources that were not in use. The administrator realizes his mistake when several related services fail.
The critical thing to remember is that once you delete an Azure resource, it cannot be retrieved.
To solve the above problem or prevent the resources from accidental changes, we use Microsoft Azure resource Locks.
What are Azure Resource Locks?
Azure Resource Locks is a feature that provides you with more flexibility for managing your deployments. When you are giving access to your subscription to some other person or allowing them to deploy resources, there are some scenarios where the user needs to have exclusive access to all of your subscriptions so they can perform their function without being affected by other deployments. Azure Resource Locks provide you with just that flexibility.
Azure resource locks are a vital component of Azure resource groups best practices, helping to secure resources from accidental changes. By implementing Azure locks, you can add an extra layer of protection to your critical assets, ensuring that they remain safe from unintentional modifications. These locks act as a safeguard, preventing users from making changes that could potentially disrupt your Azure environment. By incorporating Azure resource locks into your management strategy, you demonstrate a commitment to maintaining the integrity and stability of your resources, in line with Azure resource groups best practices.
This feature works for both, Azure Resource Manager and classic deployments.
Here are some other details about this feature:
- This is an opt-in preview feature. You can enable it by upgrading your subscription to the latest version of the service. Once enabled, it cannot be disabled.
- It is currently available only in West US and East US regions (both public and virtual networks).
- It is supported for all resource types that can be deployed through Azure Resource Manager web/classic portal, PowerShell, CLI, and ARM template deployments.
- Once you enable the service, all access to Azure Resource Manager and classic deployments will require a valid lock token.
Using Azure resource locks, You can lock a subscription, resource group, or any resource as an administrator to protect other users in your tenant from mistakenly deleting or altering key resources. Regardless of the user’s permissions, the lock takes precedence.
Boost your earning potential with Azure expertise. Explore our certified Azure Courses for a high-paying career
- Explore Azure DevOps Certification
Azure Resource locks are divided into two types:
- Can not delete
- ReadOnly
- As the name suggests, CanNotDelete doesn’t let you delete the resource. After this lock is applied, you cannot delete the resource even with the -force option.
- A resource can still be read and modified by authorized users, but the resource cannot be deleted.
- With ReadOnly, you can not only implement CanNotDelete but also prevent any modification to the locked resource.
- It means authorized users can read a resource, but they cannot delete or update the resources. The lock prevents authorized users from using anything other than what is granted by the Reader role.

Azure Locks Vs Azure Policy Vs Azure RBAC
The major difference is that Azure Policy is pre-deployment while RBAC and locks are post-deployment practices, but they both help with security.
Azure Policy doesn’t restrict how an operation is carried out. It ensures that the state of your resources complies with business rules, regardless if a change was made by someone who has permission to do so or not! Azure RBAC focuses on managing user actions at different scopes while locking down certain operations like deletion and changing specifications.
The Azure Lock is a great security measure to ensure that only those with appropriate permissions can make changes. The policy will not prevent deletion or changing the specs of resources, but rather restrict who has access at different scopes.
During this lab, we will create an Azure resource group and add a lock “CanNotDelete” to the resource group and then try to delete the resource group to see the behavior
There are 4 ways to configure Azure Resource Locks in Azure:
- The Azure Portal
- Azure CLI
- Azure Powershell
- ARM template
In this lab, we will use the Azure portal method to configure Azure resource Locks:
Please follow the below steps:
- Login to Azure portal
- In All services, search for Resource group and click on it.

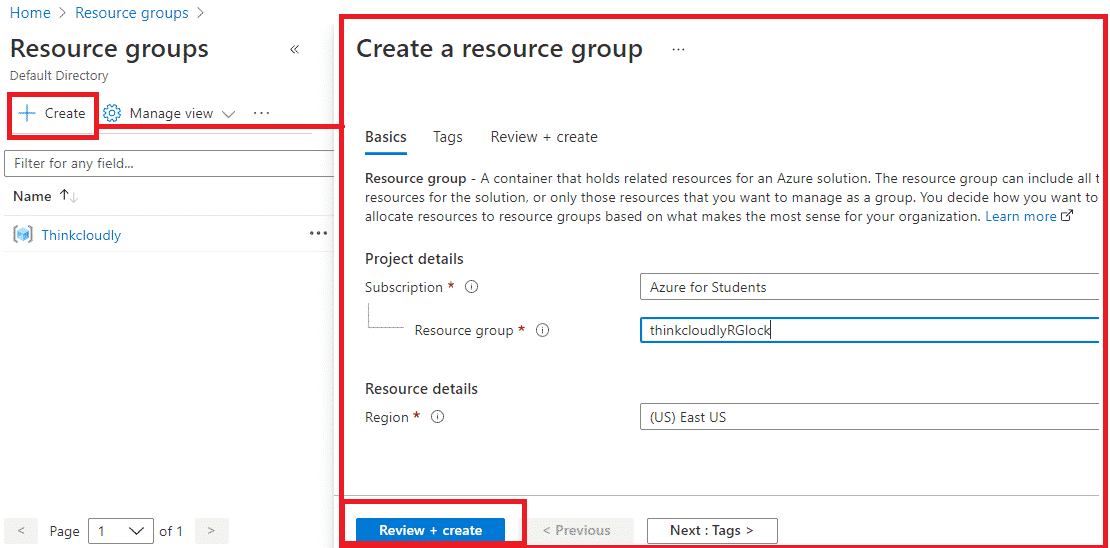
- In the Resource group blade click on +Create and give the Name of resource group as thinkcloudlyRGlock and Select region as (US) East US and click on Review + Create after validation click on Click
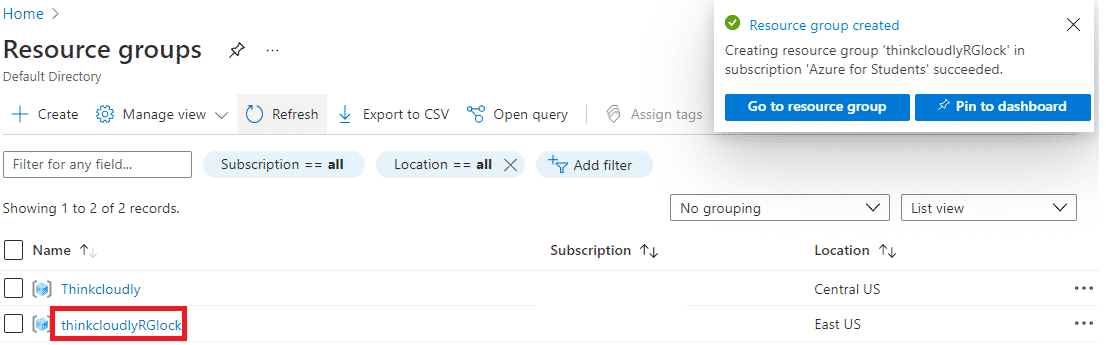
- You may access the newly created resource group by refreshing the page and clicking the entry.
Now let’s add a Lock to the Azure resource group and test it!!
- Click on resource group name thinkcloudlyRGlock
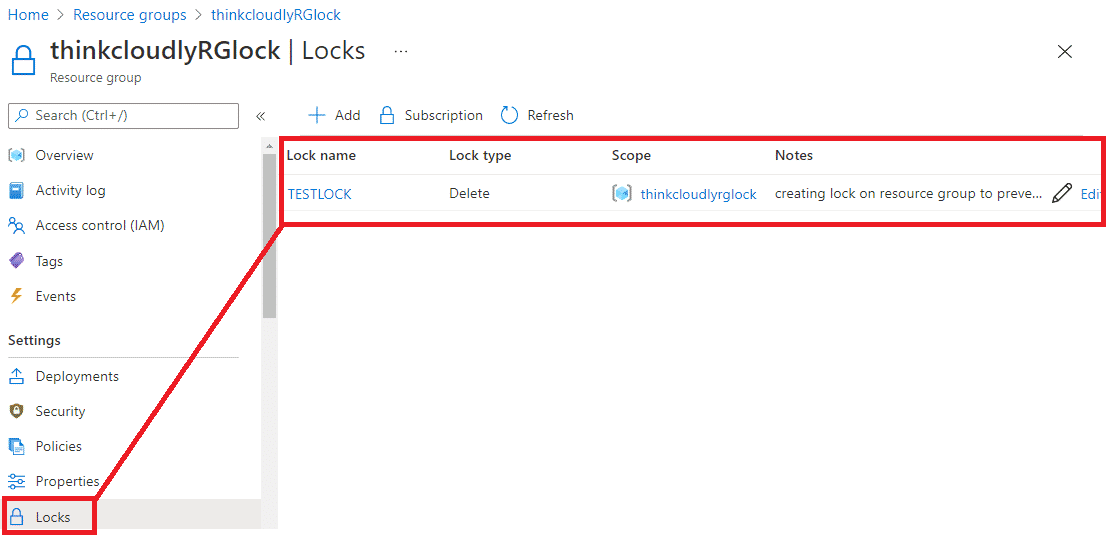
- On thinkcloudlyRGlock blade, click on Lock and then on ADD
- Give the Name of the lock as TESTLOCK, and in Lock type select Delete you can give notes also, once done click on OK
Once a lock is created, you can see the new lock in the Lock blade
- Now go to overview and click on delete the resource group and try deleting it by typing the name of the resource group and clicking on delete.
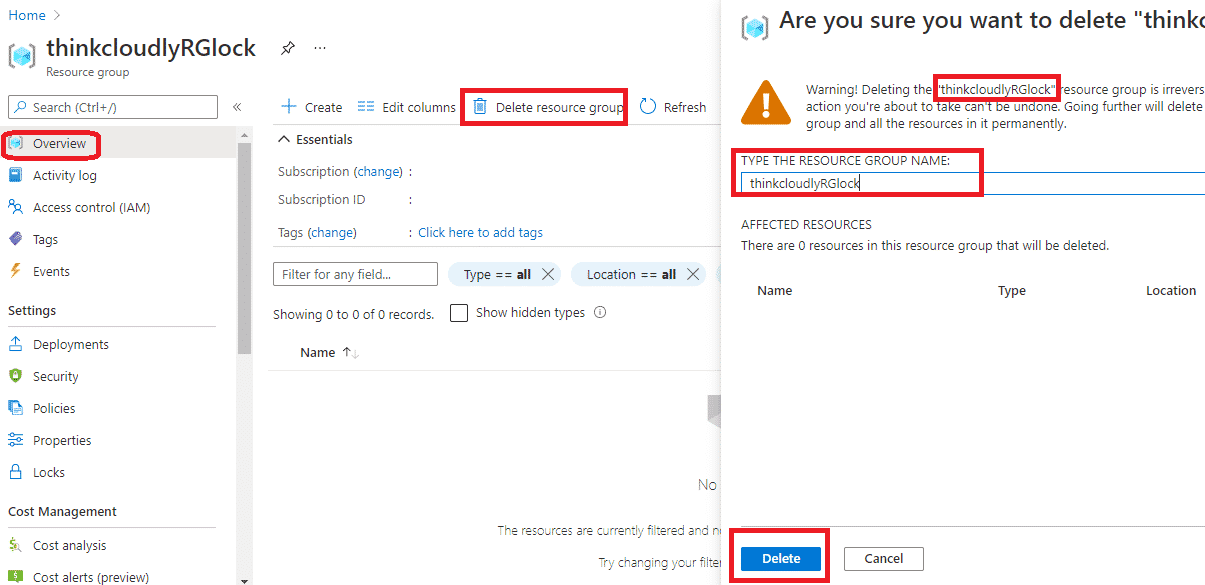
- You will see the error as a resource is locked and cannot delete.

Congratulations!! You have successfully created Azure resource group, configured resource LOCK, and tested it.
As discussed above, you can also configure Azure resource locks using Powershell.
With Azure PowerShell, you can lock deployed resources using the New-AzResourceLock command.
First of all, open and configure Powershell in Azure portal
You must provide the resource’s name, the type of resource, and the name of its resource group to lock it.
New-AzResourceLock -LockName LockGroupNotDelete -LockLevel CanNotDelete -ResourceGroupName Lock
Use Get-AzResourceLock to get information about a lock. To get all the locks in your subscription, use:
Get-AzResourceLock
To get all locks for the Azure resource group, use:
Get-AzResourceLock -ResourceGroupName exampleresourcegroup
To delete a lock for a resource, use:
$lockId = (Get-AzResourceLock -ResourceGroupName exampleresourcegroup -ResourceName example
site -ResourceType Microsoft.Web/sites).LockId Remove-AzResourceLock -LockId $lockId
Conclusion