
Cloud computing is the future of technology, and Azure Virtual machine in the Azure Cloud is at the forefront of modern Azure services. It is a great option for workloads that need the flexibility of moving to the cloud. These are fast, secure, and reliable with an easy-to-use interface available through the Azure Portal. This blog post will cover what you need to know about this new approach to IT in the Azure Cloud, so let’s start.
Creating Azure VMs: Streamlined Setup for Flexible Computing
Creating a virtual machine (VM) in Azure using the Azure Portal is a straightforward process that empowers users to set up and configure their computing resources efficiently within the Azure Cloud. By utilizing the Azure portal or command-line tools, users can initiate the Azure Virtual Machine creation process. This involves selecting the desired operating system, specifying hardware configurations, defining networking settings, and assigning Azure Data Storage options. Azure provides a range of preconfigured images through its Azure services, making it easy to deploy VMs tailored to various workloads, whether it’s for development, testing, or production environments. This streamlined process ensures that users can quickly create Azure Virtual Machine instances that meet their specific requirements, all within the robust and scalable Azure cloud infrastructure.
Creating an Azure Virtual Machine with a preset configuration like “Standard_D2s_v3” is a seamless process in Azure’s cloud platform. By signing into the Azure portal, you can easily create a virtual machine, choosing the specific configuration you desire. Azure’s flexibility allows you to effortlessly create, configure, and manage Azure Virtual Machine instances, making it the ideal choice for deploying and running your workloads with ease. So, when you need to create a virtual machine in Azure, the standard_D2s_v3 configuration is just a few clicks away way inside the Azure Portal, simplifying your Azure Cloud computing journey.
What is Virtualisation?
Let’s begin by understanding virtualization. In layman’s terms, virtualization enables users to run multiple operating systems such as Windows and Linux on a single physical machine at the same time. Such operating systems are known as guest Oses (operating systems). Virtualization deploys software that makes an abstraction layer across computer hardware, letting processors, etc of a particular computer be segmented into several virtual elements called Virtual Machines (VM), which are widely used in Azure Cloud environments and Azure services like Azure Virtual Machine.
What is Azure Virtual Machine?
Azure Virtual Machine is one of the core Azure services in the Azure Cloud. Azure virtual machines are a great way to create and deploy your own cloud infrastructure without investing in expensive hardware. It lets you run Linux or Windows on Azure’s highly scalable, reliable infrastructure managed through the Azure Portal and integrated with Azure Data Storage, which is built for the cloud era of computing.
- It can be used for development and testing, Applications in the Cloud, and Extended Datacenter.
- If you are running an Azure Virtual Machine, you should keep in mind that you will be charged pay per minute for the compute time within the Azure Cloud platform.
- Prices for these vary depending on the size, operating system, and software installed as well as the Azure Data Storage used.
- It is important to keep it in Stopped (Deallocated) mode when you are not using it in the Azure Portal, in order to avoid usage fees.
Two tiers of Azure VM
- Basic – These are ideal for development and testing but do not include load balancing or auto-scaling within Azure services, and their IOPS are lower than the standard tier.
- Standard – Provides higher-performance computing, memory, and IOPS than Basic in the Azure Cloud, especially when combined with Azure Data Storage.
Boost your earning potential with Azure expertise and master Azure services. Explore our certified Azure Courses for a high-paying career in the Azure Cloud.
- Explore Azure DevOps Certification
Let’s create an Azure Virtual Machine.
An Azure Virtual Machine can be created in the below ways using different Azure services:
- Azure Portal – It is an easy way for users to create virtual machines in the Azure Cloud.
- Templates- We can also create virtual machines in Azure, using ARM Templates, which is useful when you want to create several machines with the same configuration within Azure services.
- Client Disks – Azure Resource deployment using C# integrated with Azure Data Storage.
- REST APIs – using REST APIs we can create or update Azure Virtual Machine resources in the Azure Cloud.
- PowerShell – We can also create virtual machines with PowerShell using automation tools in Azure services.
In this Blog, we will use the first method we will create an Azure virtual machine using the Azure portal, let’s start:
-
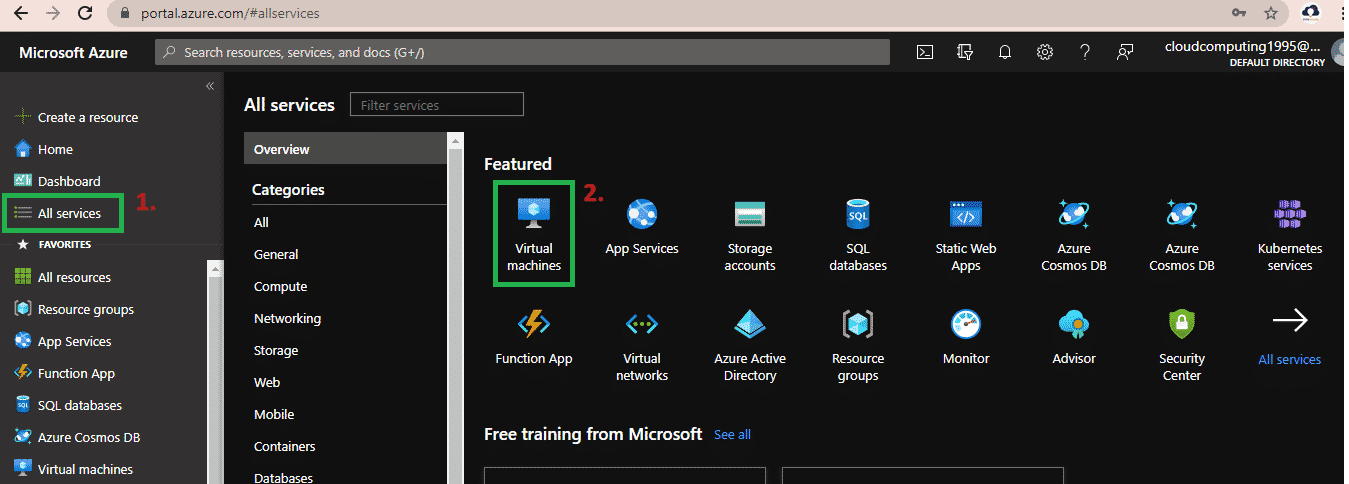
- Login to Azure portal https://portal.azure.com.
- Go to all services and click virtual machines.
-
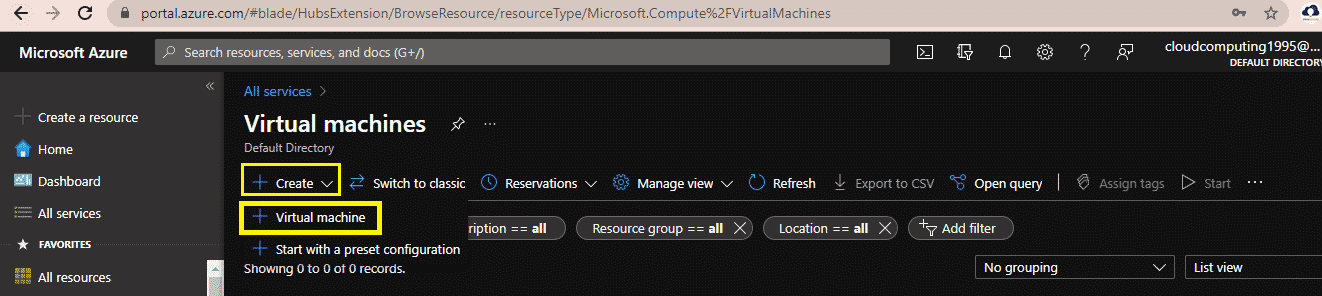
- On this page click on Create and select the virtual machine.
Fill below details in the Basic tab and click Next: Disks:
| Settings | Values |
| Subscription | Select default Subscription |
| Resource group | Create a new resource group |
| Virtual machine name | myfirstVM |
| Region | (US) Central US in Azure Cloud |
| Availability Options | Availability zone |
| Availability zone | 1 |
| Image | Windows 10 Pro, Version 20H2 – Gen1 |
| Size | Standard_D2s_v3 -2vcpus, 8 GiB memory |
| Administrator account username | think cloudly |
| Administrator account password | Thinkcloudly@1234 |
| Inbound port rules – | **Allow select ports ** |
| Select inbound ports | RDP (3389) and HTTP (80) |
| Licensing | I confirm I have an eligible Windows 10 license with multi-tenant hosting rights |
-
- Keep all disk-related data as default including Azure Data Storage configuration and click on next networking.
- Go to the Networking tab in the Azure Portal and select HTTP (80) and RDP (3389) in the section Select inbound ports and keep the rest of the options as default.
- Click on
 one validation completes clicking on create
 - Wait for deployment to get completed in the Azure Cloud.

Now, As we have created the Azure Virtual Machine Let’s connect to it using RDP
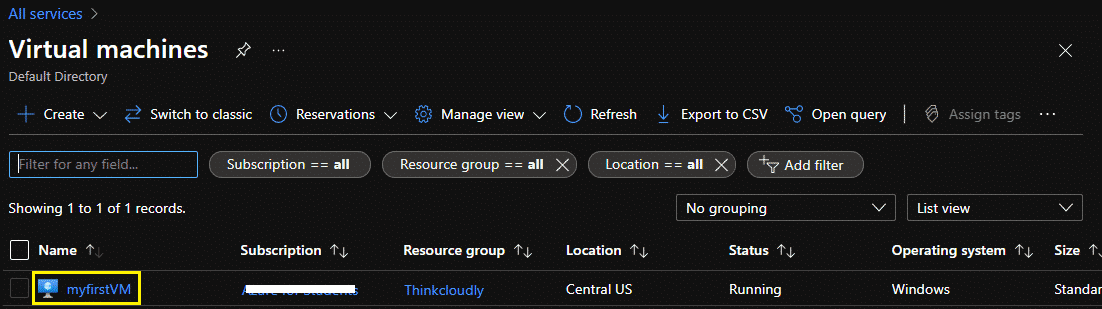
- Go to Virtual machines from All services blade in the Azure Portal and select the newly created VM myfirstVM
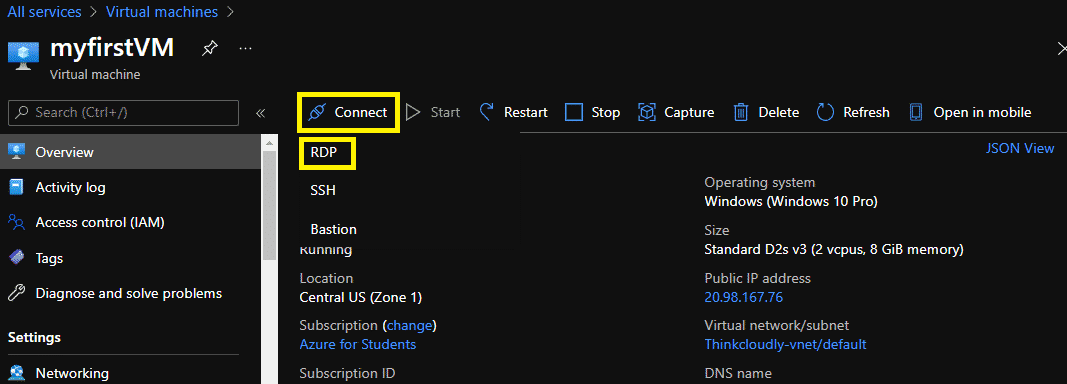
- Click on connect and then click RDP after that download the RDP file by clicking on.

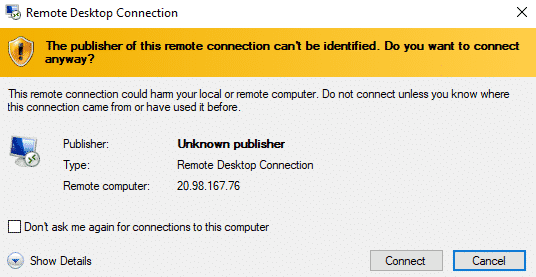
- Open the downloaded RDP file and click Connect when prompted.
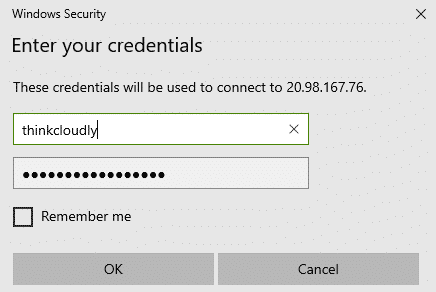
- Give username thinkcloudly and password Thinkcloudly@1234 on the Windows security page.
- A new Azure Virtual Machine will launch inside your Lab in the Azure Cloud environment. Accept the dashboard that appears for settings. You should see the blue background of your virtual machine.
Congratulations! You have deployed and connected to a Azure Virtual Machine running Windows Server using the Azure Portal and integrated Azure services.
Azure is really interesting to study and it lands you in your dream company working with Azure Cloud technologies. Our students with experience in Azure Service are making $100,000 an average. Explore our more free resources on Azure:
- Practice with Azure live project training using Azure Virtual Machine.
- Read the blog over Azure live projects using Azure Cloud tools.
- Read top Azure interview questions and answers about Azure services.
- Don’t forget to register for our free zoom webinars on Azure.
Conclusion:
The Azure Virtual Machine is a powerful computing resource in the Azure Cloud that allows you to create and deploy applications without having to worry about physical hardware. This is accomplished by using an elastic pool of resources provided by Azure services, which can be scaled as needed and integrated with Azure Data Storage. It provides high availability for your application and helps protect against data loss due to disasters like natural disasters or human errors such as accidentally deleting files from servers. You may want to look into our cloud computing courses if this sounds intriguing and want to build a career in Azure Cloud technologies.
