*Please download resources before you proceed with the steps.
Do you have an AWS account? If so, congratulations! Not only are you one of the more than 1 million users in the Amazon Web Services family, but you’re now in the unique position of being able to build your own infrastructure and expand your business capabilities beyond what many would consider possible with just one company’s technology. The Amazon Web Services (AWS) Classic Load Balancer can provide you with more uptime, flexibility, and speed than ever before. But how does it work? How do you use it? Is it hard to set up?
“AWS Classic Load Balancer: Efficient Traffic Distribution”
The AWS Classic Load Balancer (CLB) is a pivotal component in distributing incoming network traffic across multiple Amazon EC2 instances. As an integral part of the AWS ecosystem, the Classic Load Balancer ensures enhanced fault tolerance and high availability by seamlessly distributing workloads. This load balancer efficiently handles traffic spikes, optimizes resource utilization, and contributes to a seamless user experience. With its established reputation and comprehensive features, the AWS Classic Load Balancer remains a fundamental choice for architecting robust and reliable applications within the AWS infrastructure.
When setting up an AWS Classic Load Balancer (CLB), it’s crucial to prioritize CLB security. Classic Load Balancers provide essential traffic distribution for your applications, but neglecting security measures can leave your infrastructure vulnerable. To enhance CLB security, consider implementing measures like configuring security groups, enabling access logs, and utilizing SSL/TLS certificates. These steps will help safeguard your applications and data while benefiting from the classic load balancing capabilities of AWS CLB.
Classic Load Balancer ( CLB )
You can think of a load balancer as a traffic cop for incoming web traffic. When you set up a load balancer, it monitors your incoming traffic and directs it to specific instances in your EC2-Classic environment.
Using a load balancer lets you distribute requests across multiple EC2-Classic instances or terminate SSL connections coming from HTTPS clients. Load balancing also helps improve availability by directing traffic to healthy servers that are configured identically so that no one instance becomes a bottleneck.
You can place your Amazon EC2-Classic resources in multiple availability zones within an AWS region so that if there’s a failure or disruption at one location, your website is still available via another location.
The Classic Load Balancer operates at both the request and connection levels and provides basic load balancing in many Amazon EC2 instances. It’s intended for use with EC2-Classic-based applications. CLB gives you benefits in the following ways:
- Provides Support to TCP and SSL listeners.
- Support to Sticky Session.
- Support to EC2- Classic.
Boost your earning potential with AWS expertise. Explore our certified AWS Courses for a high-paying career
How does a Load Balancer work?
An Amazon Elastic Compute Cloud (Amazon EC2) virtual private cloud (VPC) requires a load balancer. For traffic between your instances and end users, you can use a default instance (which distributes all incoming traffic among multiple backend instances) or you can use a classic load balancer.
You can create up to five classic load balancers in each VPC. They distribute traffic across multiple Availability Zones and are centrally managed through Amazon EC2. Traffic distribution is controlled by health checks, which ensure that each instance responds before receiving more requests. If one of your instances goes down for maintenance, a new request goes to another instance without affecting user experience.
Each load balancer handles two failover targets at one time: if one fails, traffic automatically switches over to another target without impacting user experience. With up to 10 Gbps of throughput per load balancer, they’re designed for heavy usage on high-traffic websites with 100s of dynamic applications and/or microservices running behind them.

Creating your own classic load balancer
Steps to create EC2 instances for CLB:
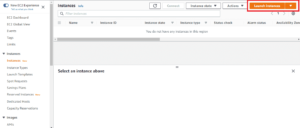
- Open AWS Management Console and search EC2.
- Click on Instances in the left sidebar.

3. Click on Launch Instances.
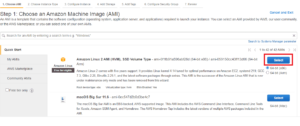
4. In Step 1: Choose AMI, select Amazon Linux 2 AMI (HVM), SSD Volume Type.
5. In Step 2: Choose an Instance Type, select t2 micro (free tier eligible) and then next.

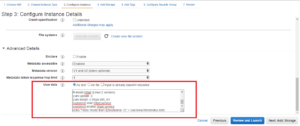
6. In Step 3: Configure Instance details, give a number of instances as 2.

7. In User Data, add or copy/paste the code for your application to run and click next.
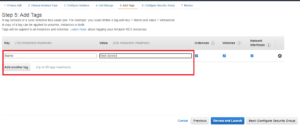
8. Skip to Step 5: Add Tags, select Add Tags and give key and its value. Click Next.
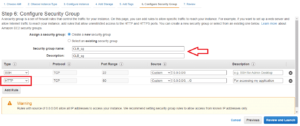
9 . In Step 6: Configure Security Groups, give a unique Security Group Name and description. Click on Add Rule and select HTTP from the dropdown menu. In source, choose custom or anywhere to make the application visible to everyone from anywhere.
Click on Review and Launch.
10 . In Step 7: Review Instance Launch, click Launch and then Launch Instances.

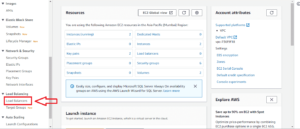
In the Instances section you can see the 2 instances created. You can try running these applications by copying their public IPv4 addresses in the browser.
Your application would look like this:-

Now, we will create a Classic Load Balancer (CLB) and connect it with both of these application servers.
Steps to create Classic Load Balancer(CLB):-
- In EC2 dashboard, click on Load Balancers in the left sidebar.
2. Click on Create Load Balancer and then in Select Load Balancer Type, click Create under Classic Load Balancer.

3. In Step 1: Define Load Balancer, give CLB a unique name, leave all other settings as default and click Next.
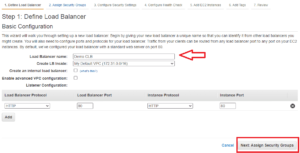
4. In Step 2: Assign Security Groups, create a new Security Group and give it a name and description. Add HTTP protocol to it and then click Next.

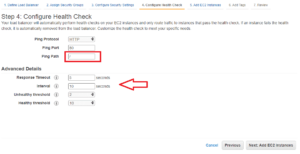
5. Skip to Step 4. In Advanced Details, set Interval time as 10 seconds. Click Next.
6. In Step 5: Add EC2 Instances, select all the instances you want to add in the load balancer.

7. In Step 7, Review and Create the Classic Load Balancer. Click Create.
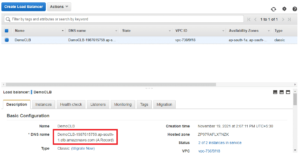
You have successfully created your first Classic Load Balancer. To check it’s working, you first need to check your all the instances are working.

To access your application using CLB, copy and paste the DNS name from the description to the new browser and run it. You can observe getting responses from different IPs by refreshing the page after every 10 seconds.
Your applications output will look like:-


You can observe 2 different IPs being accessed using the same link( DNS name).
Congratulations! You have configured how to use Classic Load Balancer.
Conclusion:
When looking for scalability without downtime, Load Balancing may be what you are looking for. Load Balancing distributes incoming traffic evenly among several backend servers so that when one server gets too busy, it will send some of its workloads to another server. This ensures your system never goes down and always has enough resources when needed. Check out our latest blog posts on AWS and explore job-oriented courses on AWS with us if this sounds like something you’re interested in!